1. Interfacing with BBC Basic.
Download the files (11k) . |  |
The aim of this very short tutorial is to show how a BBC Basic program can be run from WimpBasic (WB) but also show how you can pass data between the two languages. There are undoubtedly more complex ways via the Wimps messages or memory blocks. However if you are using WB you may well not want to be involved with the nuts and bolts of the Wimp.
Why would you want to. Well you may have written a single tasking application and want to put the user choices in a windowed environment. A good example is Quake, or Abuse (although these user higher languages).
The demo produced !Basic is very simple but shows all of the principles needed to make your own programs function. The Wimp front end does not have an info window, but then you will know how to create one of these for yourself.
The download, consists of the fully compiled application with all data/basic files included. It also contains for those interested the standard uncompiled WB file. There is also a program listing for those without WB.
The parameter passing utilizes text files,because WB and BBC store strings and variables in different formats. WB can read BBC data files but not the other way. The handling of text files is not very difficult and anyway the basics are shown in the example. So just copy!!
The article assumes that you have produced at least the Hello World example as supplied by Clares. If not go and do it now.
Getting Started.
1. Windows.
Create the window as shown below in the window editor. The Window should be called choices,as the name in the main window and also as the windows title in the window data editor. Set the window sizes as small as possible.

The choices window
The icon holding the word name can be called whatever you want (I've called it text1$). The Writable field should however be called writable$. The set button should be set as close$.
You need to create 3 radio buttons. The easiest way is to create the first one then make two copies. After the copies have been made make sure they are all selected and then from the editor menu select amend selected. You then need to set the ESG Group to 1. All this does is keep the window updated via the Wimp, rather than making you do all the work. Click OK and the select attributes window will appear. Click on ESG and OK.
2. Variables
For the purpose of this demo you need to create a variable group global. Within the group create a variable opt%. This will keep tabs on the value controlled by the radio buttons.
Your Variable/group window should look like the one below. It is important that Writeable and global:opt% exist as they will be referenced in the code.

The Variables Viewer
3. Menus
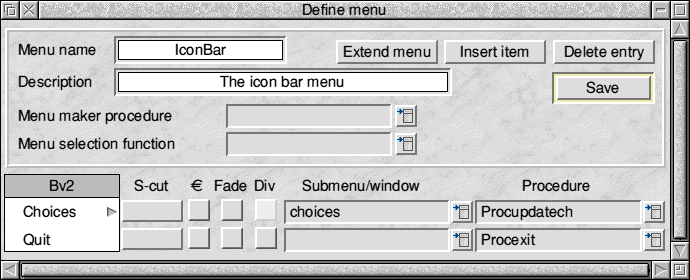
We need to create one menu for the icon bar. Using the menu Editor create a menu Iconbar, with the entries choices and Quit. Save the menu for the time being, without further amendment.
4. Some code
We now need to create some code that will link all of the previously created elements together. Whenever I start a new project I always create the code that will be called to exit the program. Usually because I like to get the skeleton program up and working.
So here it is :
DefProcexit

QUIT

Endproc
For the next code items go into the window editor and select the first radio button, and from the menu click amend selected. Midway down the window, is three drop down menus. Click in the grey box next to procedure. The code editor window will open with an empty procedure called ProcMouseClick. After the REM statement enter a new line :-
global:opt%=1
(Hint you can save typing by using the menu enter/variable).
Press f3 to save the procedure. You need to do the same for the other two radio buttons. Just remember to give global:opt% the values two and three. If you use the same method the code editor will report the error 'not a unique procedure/function name. Simply add a two or three to the end of the procedure name and save again.
Next create a procedure Procwind.
Defprocwind

REM hide choices

Hide choices

Endproc
Go to the window editor again and select event handlers. From the drop down menu next to close window event select procwind. This means that when the user clicks on the close window icon WimpBasic will hide the window and not close it. This will mean that the variables will not be lost.
In fact we will open the window and hide when the program first starts to enable the various variables to be created.
Create a new procedure updatech
Defprocupdatech

REM updates the choices window

Case global:opt% of

When 1

Setselect choices:r1$,True

When 2

Setselect choices:r11$,True

When 3

Setselect choices:r111$,True

Endcase

Endproc
So what is this doing. When the data file is first read in by the program, you will want the radio buttons to display the correct value. The Setselect icon will set the relevant icon if the value is true. Because the radio buttons are in the same ESG Group the others will be unset.
Next go to the main WimpBasic window and click on the startup procedure name.
You will have the code editor open with a blank procedure DefprocstartupProcedure
Enter the following lines :-
Open choices

Hide choices

Procreadfiles
As stated previously the program opens the choices window and then hides it again. This enables us to read in the variables from the data file, and then assign them to the relevant variables within the window.
You will be pleased to know the program is nearly done.
Create a new procedure defprocreadfiles and enter the following:-
Rem reads the files at various points.

Local x%,path$,t$,y%,a$

path$=System:path$+"file"

x%=Openin(path$)

t$=Get$#x%

choices:writeable=t$

y%=Bget#x%

Close#x%

a$=Chr$(y%)

global:opt%=Val(a$)

Procupdatech

Endproc
So what does this all do. First of all we set up some local variables to be used within the function. The next line simple creates the path to the data file with our information in.
Line 3 opens the file and assigns a data channel for input.
Line 4 reads in the first element of the data. In our case WimpBasic from Clares'
Line 5 assigns the data to choices:writeable, so will appear when the window is opened.
Line 6 reads in the next byte of data.
Line 7 closes the text file.
Line 8 converts the byte of data read in into its ASCII character. Remember a three will be stored as ASCII 51
Line 9 changes the ASCII character into its numerical value and assigns it to global:opt%
Line 10 calls procupdatech
Create a further procedure Defprocwritefiles with the following :-
Rem write a text file

Local X%,path$,T%,a$,a%,b$

a$=choices:writeable$

a%=global:opt%

T%=&FFF

path$=system:path$+"file"

x%=OpenOut(path$)

Bput#X%,a$

b$=Str$(a%)

Bput#X%,b$

Close#X%

FileSetFileType path$,T%

Hide choices

Endproc
The first four lines are self explanatory. We are simply creating and assigning values to various variables. Normally I would not assign choices:writeable$ to a$, for a file write operation, but by putting Bput#X%,choices:writeable$ I couldn't get the program to run without crashing. This is also why T% is set to the value of &FFF
Note the syntax of FileSetFileType. The manual states that brackets are needed. they are not, but the space between the keyword and path$ is required.
Note that before writing the global:opt% to file it is converted to a string.
The final line simply closes the choices window.
That is more or less the end of the Wimp front end. One more procedure to go. Before we write it we will link the various bits and pieces together.
First of all go to the window editor and open the choices window. Select the set button and click on amend selected. From the drop down menu in Procedure choose Procwritefiles and click ok.
Next go to the menu editor and open the iconbar menu. Following across from the submenu/window choose choices, and in procedure select procupdatech.
For quit choose the procedure Procexit. Save the amendments.

The Menu Editor
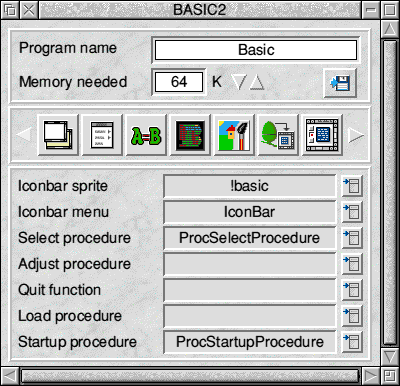
In the main window choose a sprite for the iconbar. If you're really keen create your own icon and add it to the sprite section of WimpBasic (a mode 27/28 sprite needs to be no bigger than 34 x 34 pixels)
Next from the drop down menu next to Iconbar menu select iconbar.

The main WB window
The final act is to create the procedure that will run the Basic V program.
Return to WBs main window and click in the grey box next to select in procedure.
A default ProcselectProcedure will be created. Add these lines :-
Rem this proc calls the basic routines.

Local B$

B$=System:path$+"basicv"

Oscli "BASIC -quit"+B$

Endproc
There is not much to say about this. The OSCLI command calls BBC Basic, runs the program and then quits basic at the end.
Save the procedure. You can now compile the program, but DO NOT run it, as the data file and the Basic 5 program need to be written first.
Once you have successfully compiled the program, open the application (Shift Double click)
In your text Editor (Edit,Stronged,Zap) create a text file with the lines
WimpBasic from Clares
1
Make sure you press return after the 1, to mark the end of the text. Save the file as 'file' in the application directory.
The final stage is to create the Basic V file.
Using your favourite Basic editor create a BASIC file with the following lines :
REM the code for the experiment

REM THIS could be anything.

:

ON ERROR REPORT:PRINT path$:END

PROCstart

PROCcode

END


:

DEFPROCstart

REM Read in the input file

path$="<Basic$Dir>"+".file"

x%=OPENIN(path$)

t$=GET$#x%

y%=BGET#x%

A$=CHR$(y%)

col%=VAL(A$)

CLOSE#x%

ENDPROC

:

DEFPROCcode

MODE 28

REM SET UP COLOURS FROM THE INFO TAKEN FROM THE FILE

CASE col% OF

WHEN 1 : C1%=15:tint%=192

WHEN 2 : C1%=13:tint%=192

WHEN 3 : C1%=52:tint%=192

OTHERWISE C1%=63:tint%=192

ENDCASE

REM A SIMPLE PATTERN DRAWN ON SCREEN

GCOL0,C1% TINT tint%

FOR across=250 TO 850 STEP 200

FOR down=200 TO 600 STEP 200

FOR X=0 TO 200 STEP 10

MOVE across,down+X:DRAW across+200-X,down

NEXT

NEXT

NEXT

REM PRINT THE TEXT CENTRED ON THE SCREEN

A%=80 DIV 2

B%= LEN(t$)

C%=A%-(B%DIV2)

COLOUR C1% TINT tint%

PRINTTAB(C%,50);t$

ENDPROC
Save this file within the application as basicv.
The program needs very little description. Defproccode simply draws a simple little pattern on screen (one that I have used since the BBC Micro days). Using the colour information generated by the Wimp front end.
Defprocstart is very similar to that in the WimpBasic program, in that it reads in the variables from the text file and assigns them to variables. As someone more famous has said 'that's all there is to it.'
In reality you would in fact be using the Wimp front end to set up keys, set screen modes or sound levels. Whatever you want to put a front end onto the principles remain the same. If you are a C programmer you may be able to use other data structures, but that is beyond the scope of this simple how to article.
It should also be remembered that my techniques may not be the best, the aim of the article is to offer ideas for the use of Wimp Basic.
The principles outlined above could be expanded so that you load in save game data from the Wimp, write temporary files, from the single task application so that you can return to the Wimp environment and return to the basic 5 program later. Be careful though if you attempt this as every variable used by your program would have to be written to file.
If you have comments or other ideas why not mail me and I will include them on this page.
Happy programming!!
|